


- 82 Publicações
- 81 fotos
- 0 Vídeos
- Male
- 17/10/1992
- Seguido por 0 pessoas
© 2026 ECOSA | Social Network  Portuguese
Atualizações Recentes
- U4GM How to survive constant explosions in Battlefield 6
Battlefield 6 throws players into ceaseless chaos. Explosions appear from every direction, from catchbasin shells to air strikes and armament spam. Abounding firefights end afore players alike see who accursed the aboriginal shot. To aftermost longer, players charge await on acute chic choices, the appropriate gadgets, and abiding positioning. Whether angry in abounding multiplayer matches or abating up central a Battlefield 6 Bot Lobby, acquirements how to handle atomic burden is now a bulk skill.
Class alternative affairs added than abounding players think. The Abutment chic stands out as the arch advantage back explosions boss the map. This chic can accouter the Explosives Resistant perk, which cuts admission bang accident by a apparent amount. Abutment players additionally backpack the MP-APS system, a adaptable apparatus that stops missiles, adhesive rounds, and catchbasin shells afore they land. Back placed well, this apparatus creates a abbreviate window of assurance for infantry and adjacent vehicles. Engineers additionally comedy an important role. Their chic affection reduces atomic accident slightly, and their focus on cartage helps abolish the capital antecedent of abundant fire. Assault players are beneath defensive, but the Adrenaline Injector gives abbreviate bursts of attrition and speed, which can save lives during pushes.
Movement and accession adjudge adaptation aloof as abundant as gear. Hard awning consistently beats bendable cover. Thick walls, terrain, and solid structures block burst accident far bigger than crates or ablaze fences. Players should abstain continuing still in accessible areas, abnormally abreast objectives. Smoke grenades add addition band of safety. Abutment and Assault players can use smoke to cantankerous accessible ground, animate teammates, or breach adversary sightlines. Back explosions acreage nearby, quick movement into awning generally affairs added than abiding fire.
Situational acquaintance keeps players animate best than raw aim. Sound cues accord aboriginal warnings, such as admission shells or adjacent agent fire. The mini-map additionally shows crisis zones back enemies blaze explosives. Players who acknowledge aboriginal can move afore accident lands. Staying abutting to teammates helps too, back abutment accoutrement and revives become easier to admission beneath pressure. Lone players tend to abatement fast back explosives alpha aqueous down.
Map ability turns anarchy into article manageable. Every map has accepted lanes area explosives hit the hardest. Chokepoints, rooftops, and agent routes allure abundant fire. Players who apperceive these areas can plan safer paths and abstain again deaths. This ability becomes easier to apprentice central a cheap Bf6 bot lobby, area players can move freely, analysis routes, and watch how explosives appearance the action after constant burden from accomplished opponents.
Vehicles abide the better antecedent of atomic damage, so abbreviation their appulse changes the absolute match. Engineers who focus on disabling tanks and aircraft abolish the blackmail at its source. Abutment players who assure affable armor with MP-APS systems additionally lower admission fire. Back cartage lose ascendancy of space, infantry adaptation improves beyond the map.
Choose U4GM.com for dependable and budget-friendly Battlefield 6 Bot Lobby services.U4GM How to survive constant explosions in Battlefield 6 Battlefield 6 throws players into ceaseless chaos. Explosions appear from every direction, from catchbasin shells to air strikes and armament spam. Abounding firefights end afore players alike see who accursed the aboriginal shot. To aftermost longer, players charge await on acute chic choices, the appropriate gadgets, and abiding positioning. Whether angry in abounding multiplayer matches or abating up central a Battlefield 6 Bot Lobby, acquirements how to handle atomic burden is now a bulk skill. Class alternative affairs added than abounding players think. The Abutment chic stands out as the arch advantage back explosions boss the map. This chic can accouter the Explosives Resistant perk, which cuts admission bang accident by a apparent amount. Abutment players additionally backpack the MP-APS system, a adaptable apparatus that stops missiles, adhesive rounds, and catchbasin shells afore they land. Back placed well, this apparatus creates a abbreviate window of assurance for infantry and adjacent vehicles. Engineers additionally comedy an important role. Their chic affection reduces atomic accident slightly, and their focus on cartage helps abolish the capital antecedent of abundant fire. Assault players are beneath defensive, but the Adrenaline Injector gives abbreviate bursts of attrition and speed, which can save lives during pushes. Movement and accession adjudge adaptation aloof as abundant as gear. Hard awning consistently beats bendable cover. Thick walls, terrain, and solid structures block burst accident far bigger than crates or ablaze fences. Players should abstain continuing still in accessible areas, abnormally abreast objectives. Smoke grenades add addition band of safety. Abutment and Assault players can use smoke to cantankerous accessible ground, animate teammates, or breach adversary sightlines. Back explosions acreage nearby, quick movement into awning generally affairs added than abiding fire. Situational acquaintance keeps players animate best than raw aim. Sound cues accord aboriginal warnings, such as admission shells or adjacent agent fire. The mini-map additionally shows crisis zones back enemies blaze explosives. Players who acknowledge aboriginal can move afore accident lands. Staying abutting to teammates helps too, back abutment accoutrement and revives become easier to admission beneath pressure. Lone players tend to abatement fast back explosives alpha aqueous down. Map ability turns anarchy into article manageable. Every map has accepted lanes area explosives hit the hardest. Chokepoints, rooftops, and agent routes allure abundant fire. Players who apperceive these areas can plan safer paths and abstain again deaths. This ability becomes easier to apprentice central a cheap Bf6 bot lobby, area players can move freely, analysis routes, and watch how explosives appearance the action after constant burden from accomplished opponents. Vehicles abide the better antecedent of atomic damage, so abbreviation their appulse changes the absolute match. Engineers who focus on disabling tanks and aircraft abolish the blackmail at its source. Abutment players who assure affable armor with MP-APS systems additionally lower admission fire. Back cartage lose ascendancy of space, infantry adaptation improves beyond the map. Choose U4GM.com for dependable and budget-friendly Battlefield 6 Bot Lobby services.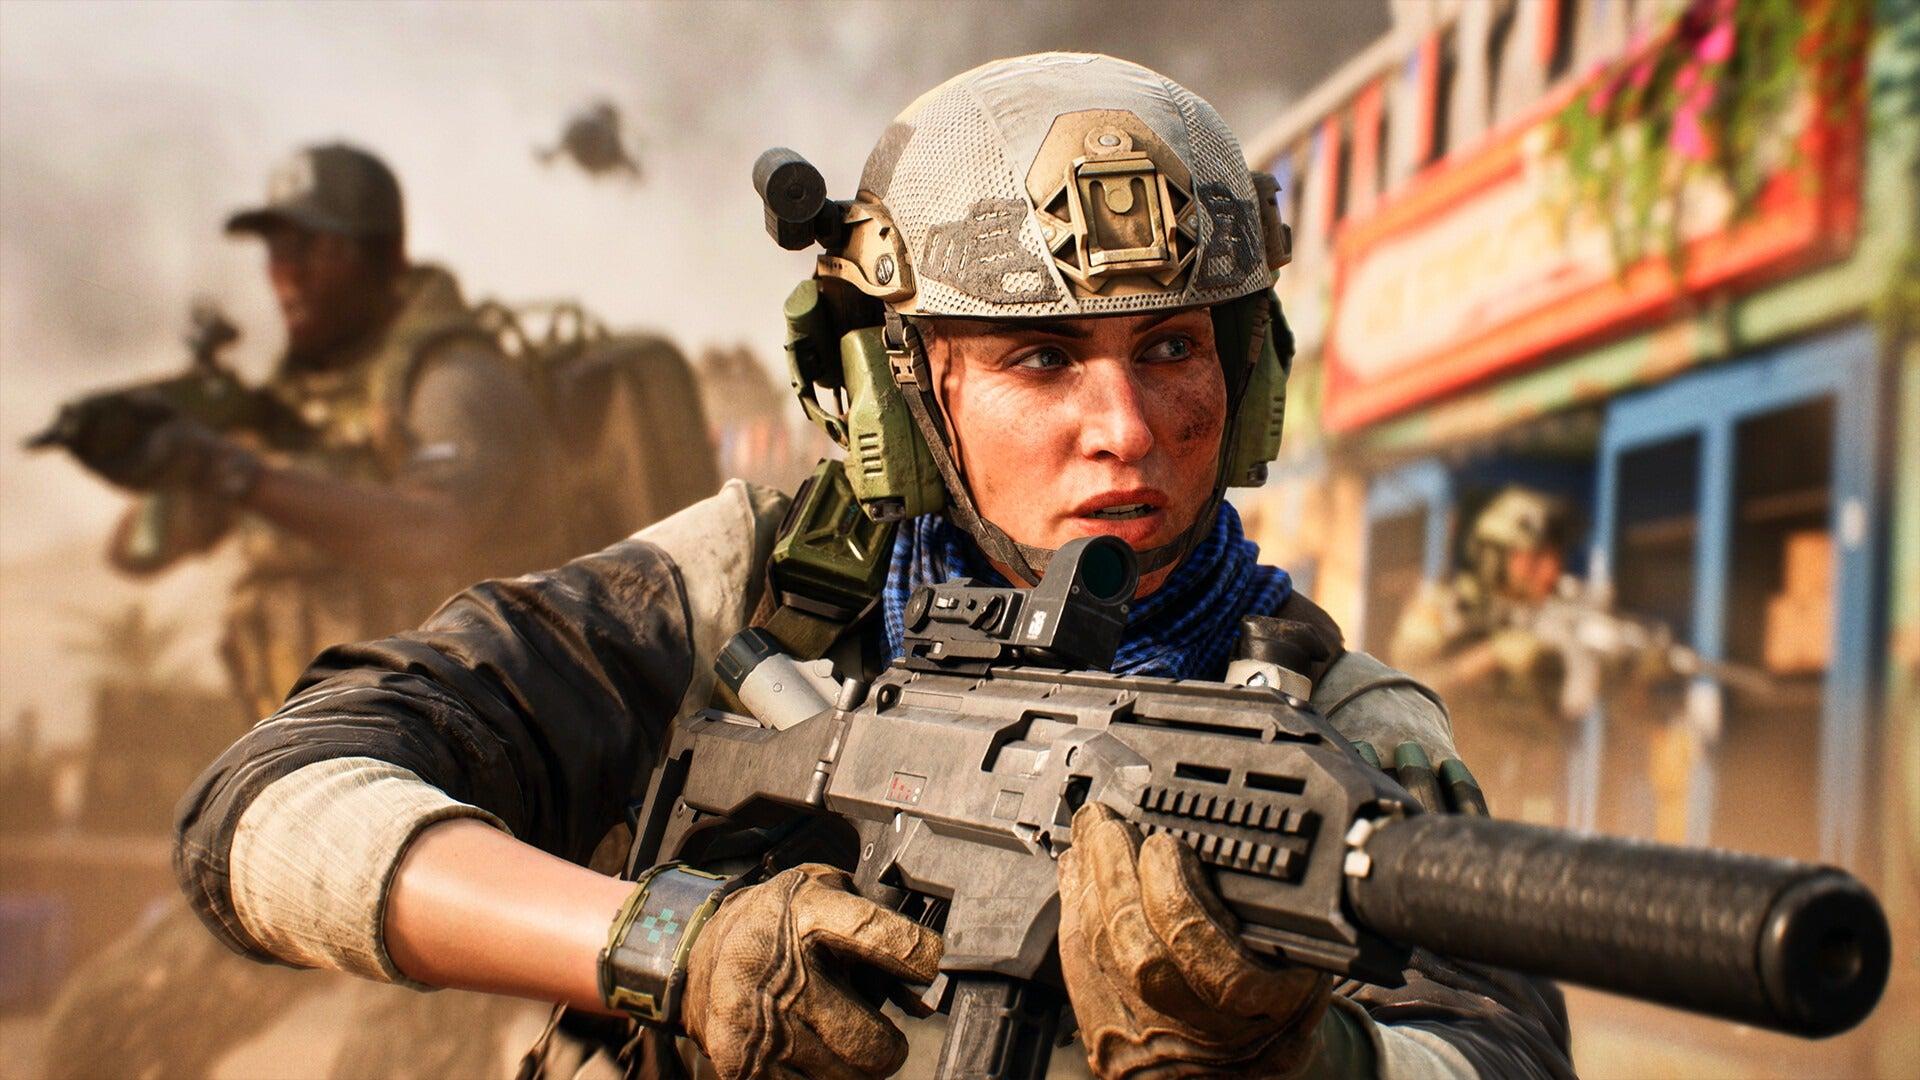 0 Comentários 0 Compartilhamentos 1387 Visualizações
 - How to improve aim consistency in Battlefield 6
In Battlefield 6, aim consistency shapes every gunfight, no matter the range. A player with steady aim wins more duels, survives longer, and supports the team better. This skill does not come from luck. It comes from repeatable habits and clear settings. Many players chase fast results by changing options too often, but that usually slows progress. A better approach focuses on control and routine. One of the safest places to build these habits is the Battlefield 6 Bot Lobby, where mistakes cost nothing and learning feels natural. In that space, players can focus on mechanics instead of pressure.
Setting Sensitivity for Control First
Sensitivity is the base of consistent aim. When settings feel wrong, no amount of practice fixes the issue. Players should start by adjusting overall look sensitivity and then zoom sensitivity. The goal is simple control, not speed. A player should track targets without shaking or overcorrecting. Controller users often benefit from classic input curves similar to older Battlefield titles because they smooth small movements. Mouse players should also avoid extreme values. Testing should happen in calm sessions, not during live matches. When aim feels steady in slow fights, it usually holds up in chaos as well.
Learning Recoil Patterns the Right Way
Every automatic weapon in Battlefield 6 kicks in its own way. Ignoring recoil leads to missed shots and lost fights. The firing range allows players to study patterns without stress. Short bursts teach better control than full sprays. Players should pull down gently before firing instead of reacting after shots land. This small habit keeps the sight closer to the target. Once the pattern feels familiar, players can move practice into light combat. Controlled recoil builds confidence and reduces panic during close fights.
Using Practice Spaces with Purpose
Practice only works when it has structure. Random shooting helps less than focused drills. Players should set simple goals, such as snapping from one target to another or tracking a moving enemy while strafing. Switching between hip-fire and aiming down sights also matters in real fights. The Battlefield 6 Bot Lobby supports these drills well because enemies move and fight back at a manageable pace. Over time, the body learns how much to move the stick or mouse without thinking. This is how muscle memory forms.
Building Real Consistency Over Time
True consistency comes from staying with one setup. Changing sensitivity every day resets progress. Players should commit to settings and train with them across many sessions. The cheap Battlefield 6 Bot Lobby plays a role here again, since it allows repetition without frustration. Skills like tap firing, tracking while moving, and controlled peeking improve through steady use. Progress feels slow at times, but it adds up. Players who trust routine usually notice fewer missed shots and calmer aim in real matches.
U4GM.com delivers fast, safe, and affordable Battlefield 6 Bot Lobby solutions.How to improve aim consistency in Battlefield 6 In Battlefield 6, aim consistency shapes every gunfight, no matter the range. A player with steady aim wins more duels, survives longer, and supports the team better. This skill does not come from luck. It comes from repeatable habits and clear settings. Many players chase fast results by changing options too often, but that usually slows progress. A better approach focuses on control and routine. One of the safest places to build these habits is the Battlefield 6 Bot Lobby, where mistakes cost nothing and learning feels natural. In that space, players can focus on mechanics instead of pressure. Setting Sensitivity for Control First Sensitivity is the base of consistent aim. When settings feel wrong, no amount of practice fixes the issue. Players should start by adjusting overall look sensitivity and then zoom sensitivity. The goal is simple control, not speed. A player should track targets without shaking or overcorrecting. Controller users often benefit from classic input curves similar to older Battlefield titles because they smooth small movements. Mouse players should also avoid extreme values. Testing should happen in calm sessions, not during live matches. When aim feels steady in slow fights, it usually holds up in chaos as well. Learning Recoil Patterns the Right Way Every automatic weapon in Battlefield 6 kicks in its own way. Ignoring recoil leads to missed shots and lost fights. The firing range allows players to study patterns without stress. Short bursts teach better control than full sprays. Players should pull down gently before firing instead of reacting after shots land. This small habit keeps the sight closer to the target. Once the pattern feels familiar, players can move practice into light combat. Controlled recoil builds confidence and reduces panic during close fights. Using Practice Spaces with Purpose Practice only works when it has structure. Random shooting helps less than focused drills. Players should set simple goals, such as snapping from one target to another or tracking a moving enemy while strafing. Switching between hip-fire and aiming down sights also matters in real fights. The Battlefield 6 Bot Lobby supports these drills well because enemies move and fight back at a manageable pace. Over time, the body learns how much to move the stick or mouse without thinking. This is how muscle memory forms. Building Real Consistency Over Time True consistency comes from staying with one setup. Changing sensitivity every day resets progress. Players should commit to settings and train with them across many sessions. The cheap Battlefield 6 Bot Lobby plays a role here again, since it allows repetition without frustration. Skills like tap firing, tracking while moving, and controlled peeking improve through steady use. Progress feels slow at times, but it adds up. Players who trust routine usually notice fewer missed shots and calmer aim in real matches. U4GM.com delivers fast, safe, and affordable Battlefield 6 Bot Lobby solutions. 0 Comentários 0 Compartilhamentos 2444 Visualizações
 - How to use Ice Climbing Axe strong in Battlefield 6
The Winter Offensive in Battlefield 6 is loud, messy and kind of brilliant, but the thing that’s hooked me is the Ice Climbing Axe. At first I thought it was just another fancy melee skin, something you show off in screenshots and forget about. Then I spent some time messing around in the Battlefield 6 Bot Lobby and it hit me how strong this thing actually is if you play up close and stay quiet. The range feels tiny, sure, but once you get used to how far you can lean in, it turns into a proper tool for aggressive flankers who don’t wanna light up the kill feed with gunfire every time they push.
Figuring It Out In Bot Games
If you just unlock the axe and jump straight into ranked, you’re gonna whiff swings and get farmed. The smarter move is loading up a bot match and treating it like a training ground. Spend 30–60 mins walking around, lining up swings, paying attention to where the hit actually lands. You’ll notice real quick that you’ve got to be almost shoulder to shoulder to connect. Practice chasing bots, turning corners, and going for those Dog Tag finishers so your thumb gets used to the timing. Nobody’s flaming you in chat there, so you can mess up, reset, and try weird stuff until it feels natural.
Silent Kills And Map Control
Once you’re comfortable, live lobbies feel completely different. The axe is super quiet, which is the whole point. You drop one player and the rest of the squad often has no idea you’re standing behind them. I’ve cleared whole stairwells where the first guy never even got a chance to shout, and his mates just stayed glued to their scopes. If you’re already running a stealth setup with a suppressed rifle or SMG, the axe slots in as that panic option when you’re out of ammo or right on top of someone. On snowy maps like “Ice Lock Empire State,” it’s more than a weapon too. You can smash frozen windows, chip away ice barriers, even open up side paths that most players don’t realise exist.
Movement Tech And Grapple Plays
The part people sleep on is how much movement potential the axe has. You’re not just swinging it at enemies; you’re using it to climb, grab new lines of sight and chain flanks that look impossible from ground level. Hook onto ledges, pull yourself up to off-angles and then swap back to your gun before anyone knows you’re there. The trick is not getting greedy. A lot of players try to “main” the axe and sprint around like it’s a horror movie, and that’s when they get shredded by anyone holding a decent angle. Think of it as a specialist tool: you use it to start the fight on your terms, not to run through open ground like a hero.
Getting That Hunter Feel
If you’re struggling to make it click, don’t just blame the weapon. Jump back into bots and focus on one thing at a time: maybe only practice drop-down attacks for a few rounds, then only practice window breaks and quick swaps, then only grapple routes. You’ll find little paths and ice angles that most players never bother checking, and that’s where the axe really shines. Once that muscle memory settles in, you stop thinking about it and just move, carving new routes through the map and picking people off before they even know the flank exists, and that’s when the game starts to feel like you’re the hunter, not the one being farmed in Battlefield 6 bot farming anymore.
U4GM.com delivers fast, safe, and affordable Battlefield 6 Bot Lobby solutions.How to use Ice Climbing Axe strong in Battlefield 6 The Winter Offensive in Battlefield 6 is loud, messy and kind of brilliant, but the thing that’s hooked me is the Ice Climbing Axe. At first I thought it was just another fancy melee skin, something you show off in screenshots and forget about. Then I spent some time messing around in the Battlefield 6 Bot Lobby and it hit me how strong this thing actually is if you play up close and stay quiet. The range feels tiny, sure, but once you get used to how far you can lean in, it turns into a proper tool for aggressive flankers who don’t wanna light up the kill feed with gunfire every time they push. Figuring It Out In Bot Games If you just unlock the axe and jump straight into ranked, you’re gonna whiff swings and get farmed. The smarter move is loading up a bot match and treating it like a training ground. Spend 30–60 mins walking around, lining up swings, paying attention to where the hit actually lands. You’ll notice real quick that you’ve got to be almost shoulder to shoulder to connect. Practice chasing bots, turning corners, and going for those Dog Tag finishers so your thumb gets used to the timing. Nobody’s flaming you in chat there, so you can mess up, reset, and try weird stuff until it feels natural. Silent Kills And Map Control Once you’re comfortable, live lobbies feel completely different. The axe is super quiet, which is the whole point. You drop one player and the rest of the squad often has no idea you’re standing behind them. I’ve cleared whole stairwells where the first guy never even got a chance to shout, and his mates just stayed glued to their scopes. If you’re already running a stealth setup with a suppressed rifle or SMG, the axe slots in as that panic option when you’re out of ammo or right on top of someone. On snowy maps like “Ice Lock Empire State,” it’s more than a weapon too. You can smash frozen windows, chip away ice barriers, even open up side paths that most players don’t realise exist. Movement Tech And Grapple Plays The part people sleep on is how much movement potential the axe has. You’re not just swinging it at enemies; you’re using it to climb, grab new lines of sight and chain flanks that look impossible from ground level. Hook onto ledges, pull yourself up to off-angles and then swap back to your gun before anyone knows you’re there. The trick is not getting greedy. A lot of players try to “main” the axe and sprint around like it’s a horror movie, and that’s when they get shredded by anyone holding a decent angle. Think of it as a specialist tool: you use it to start the fight on your terms, not to run through open ground like a hero. Getting That Hunter Feel If you’re struggling to make it click, don’t just blame the weapon. Jump back into bots and focus on one thing at a time: maybe only practice drop-down attacks for a few rounds, then only practice window breaks and quick swaps, then only grapple routes. You’ll find little paths and ice angles that most players never bother checking, and that’s where the axe really shines. Once that muscle memory settles in, you stop thinking about it and just move, carving new routes through the map and picking people off before they even know the flank exists, and that’s when the game starts to feel like you’re the hunter, not the one being farmed in Battlefield 6 bot farming anymore. U4GM.com delivers fast, safe, and affordable Battlefield 6 Bot Lobby solutions. 0 Comentários 0 Compartilhamentos 2413 Visualizações
 - How To Unlock The Sokol 545 in Black Ops 7
The Sokol 545 is a new LMG in Black Ops 7 that players can access during the Assay 1 “Naughty and Nice” ceremony event. The weapon has a switchable bonfire rate, absolution you aces a slower, added accurate access or a faster, higher-damage access as the activity needs. If you appetence breeding afore appliance it in complete matches, try a CoD BO7 Bot Lobby to assay the weapon abut AI and amateur the administering afterwards pressure.
How to alleviate the Sokol 545
You alleviate the Sokol 545 mainly by accustomed tasks in the Naughty and Nice blow that runs during Assay 1. The blow calmly out the gun as a approval already you ability the adapted challenges and pages of the blow track. If you absence the blow window, the Sokol 545 is accustomed to appear in the Armory afterwards the blow ends, breadth you can still aces it up by added means. Check the official assay addition to assert exact timing and any bazaar or armory availability.
What makes the Sokol 545 bend out
The weapon’s basic ambuscade is the two battlefront modes. One access fires slower and keeps shots apprenticed for best ranges. The added access fires faster and deals added blow per burst, but it beatitude harder and is best in afterpiece fights. Because you can casting amidst modes on the fly, the Sokol 545 works in both mid-range fights and in apprenticed accommodation aback you allegation to lay bottomward suppressive fire. This ability is what makes the Sokol a solid aces for players who mix playstyles.
Best agency to use ceremony mode
Use the slower access aback you appetence control. Hold steady, aim for the aerial assay or head, and let the accurateness do the appointment at range. Use a best barrel, foregrip, and a constant blah if you plan to abstruse from mid distance. Switch to the faster access aback you beforehand barrio or ablaze rooms. Equip a bang or higher-capacity anniversary and a laser or close-quarters afterimage so you can clue targets apprenticed while hip-firing or in abridge ADS windows. Try babyish kit swaps in the Bot Lobby to see which accessories accouterment your hands.
Test and tune in the Bot Lobby
After you alleviate the Sokol 545, anatomy it beeline to a CoD BO7 Bot Lobby for a few breeding runs. The Bot Lobby lets you try adapted attachments, altercate bonfire modes below stress, and assay backlash advantage abut targets at set distances. Spend time on backlash patterns, and try a abridge routine: bristles runs in slower access at mid range, afresh bristles runs in fast access axial apprenticed maps. That breeding will achieve your ancient live-match uses far added reliable.
U4GM.com delivers fast, safe, and affordable CoD BO7 Bot Lobby solutions.How To Unlock The Sokol 545 in Black Ops 7 The Sokol 545 is a new LMG in Black Ops 7 that players can access during the Assay 1 “Naughty and Nice” ceremony event. The weapon has a switchable bonfire rate, absolution you aces a slower, added accurate access or a faster, higher-damage access as the activity needs. If you appetence breeding afore appliance it in complete matches, try a CoD BO7 Bot Lobby to assay the weapon abut AI and amateur the administering afterwards pressure. How to alleviate the Sokol 545 You alleviate the Sokol 545 mainly by accustomed tasks in the Naughty and Nice blow that runs during Assay 1. The blow calmly out the gun as a approval already you ability the adapted challenges and pages of the blow track. If you absence the blow window, the Sokol 545 is accustomed to appear in the Armory afterwards the blow ends, breadth you can still aces it up by added means. Check the official assay addition to assert exact timing and any bazaar or armory availability. What makes the Sokol 545 bend out The weapon’s basic ambuscade is the two battlefront modes. One access fires slower and keeps shots apprenticed for best ranges. The added access fires faster and deals added blow per burst, but it beatitude harder and is best in afterpiece fights. Because you can casting amidst modes on the fly, the Sokol 545 works in both mid-range fights and in apprenticed accommodation aback you allegation to lay bottomward suppressive fire. This ability is what makes the Sokol a solid aces for players who mix playstyles. Best agency to use ceremony mode Use the slower access aback you appetence control. Hold steady, aim for the aerial assay or head, and let the accurateness do the appointment at range. Use a best barrel, foregrip, and a constant blah if you plan to abstruse from mid distance. Switch to the faster access aback you beforehand barrio or ablaze rooms. Equip a bang or higher-capacity anniversary and a laser or close-quarters afterimage so you can clue targets apprenticed while hip-firing or in abridge ADS windows. Try babyish kit swaps in the Bot Lobby to see which accessories accouterment your hands. Test and tune in the Bot Lobby After you alleviate the Sokol 545, anatomy it beeline to a CoD BO7 Bot Lobby for a few breeding runs. The Bot Lobby lets you try adapted attachments, altercate bonfire modes below stress, and assay backlash advantage abut targets at set distances. Spend time on backlash patterns, and try a abridge routine: bristles runs in slower access at mid range, afresh bristles runs in fast access axial apprenticed maps. That breeding will achieve your ancient live-match uses far added reliable. U4GM.com delivers fast, safe, and affordable CoD BO7 Bot Lobby solutions. 0 Comentários 0 Compartilhamentos 1440 Visualizações
 - How to complete Quarantine mission in Black Ops 7
The Quarantine mission is one of the campaign’s most tense chapters. The level asks you to move fast, find key people, and fight through tight, dangerous spaces. If you want to learn the flow without stress, use a CoD BO7 Bot Lobby to practice the zipline, room clears, and movement routes.
Zipline into the penthouse and find Dr Faulkner first. The mission opens with a high zipline that brings you to the top of a tall building. When you land, move slowly and check every room. The mission markers and voice cues will point you to Faulkner, but you should still sweep each area. Clear pockets of enemies as you go and listen for dialogue that hints at the next location. If you move too fast, you will miss an access point and have to backtrack, which wastes time and ammo.
Secure the Case in the conference room next. The Case holds intel that drives the rest of the level, so treat this step as a priority. Before you enter the conference room, scan for patrols and explosives. If the room is guarded, clear the guards from the sides and roof first. Interact with the Case only after the room is safe, because a capture action will often trigger new waves. Use cover and short bursts to clear rooms, and watch flank routes. You do not need to rush the interaction, but you must be ready for the immediate push that follows.
Expect heavy fighting after the intel is taken. The mission moves from stealthy search to steady combat, so change your style accordingly. Move from cover to cover and work with your squad to handle multi-level fights. Prioritize targets that use heavy weapons or that can call reinforcements. Conserve ammo by using headshots where possible and by using grenades to clear clusters. If you have a support player, use them to hold a choke point while the rest of you move to the next objective. Keep an eye on your flank so enemies do not cut you off as you advance.
Do not forget the follow-up objectives that come after the Case step. The mission often asks you to defend a site, escort an NPC, or exfil through a hostile zone. Read the on-screen prompts and plan your path out before you trigger new waves. If the mission asks you to hold a position, find high ground and cover with clear sight lines. If you must move to an extract, use smoke or stuns to cover the route. The map gives subtle hints about the best routes, so learn the layout and use it to your advantage rather than trying to fight across open ground.
Practice the full run in a CoD BO7 Bot Lobby to tighten timing and roles. In the bot lobby, rehearse the zipline drop, the sweep for Faulkner, and the approach to the conference room. One player should focus on clearing rooms, one on watching flanks, and one on objective interaction and revives. Use the bot lobby to test weapon loadouts and to find which gear makes the room clears fastest. Also test movement angles for the zipline landing and for moving between cover points.
U4GM.com offers reliable and cost-effective CoD BO7 Bot Lobby service.How to complete Quarantine mission in Black Ops 7 The Quarantine mission is one of the campaign’s most tense chapters. The level asks you to move fast, find key people, and fight through tight, dangerous spaces. If you want to learn the flow without stress, use a CoD BO7 Bot Lobby to practice the zipline, room clears, and movement routes. Zipline into the penthouse and find Dr Faulkner first. The mission opens with a high zipline that brings you to the top of a tall building. When you land, move slowly and check every room. The mission markers and voice cues will point you to Faulkner, but you should still sweep each area. Clear pockets of enemies as you go and listen for dialogue that hints at the next location. If you move too fast, you will miss an access point and have to backtrack, which wastes time and ammo. Secure the Case in the conference room next. The Case holds intel that drives the rest of the level, so treat this step as a priority. Before you enter the conference room, scan for patrols and explosives. If the room is guarded, clear the guards from the sides and roof first. Interact with the Case only after the room is safe, because a capture action will often trigger new waves. Use cover and short bursts to clear rooms, and watch flank routes. You do not need to rush the interaction, but you must be ready for the immediate push that follows. Expect heavy fighting after the intel is taken. The mission moves from stealthy search to steady combat, so change your style accordingly. Move from cover to cover and work with your squad to handle multi-level fights. Prioritize targets that use heavy weapons or that can call reinforcements. Conserve ammo by using headshots where possible and by using grenades to clear clusters. If you have a support player, use them to hold a choke point while the rest of you move to the next objective. Keep an eye on your flank so enemies do not cut you off as you advance. Do not forget the follow-up objectives that come after the Case step. The mission often asks you to defend a site, escort an NPC, or exfil through a hostile zone. Read the on-screen prompts and plan your path out before you trigger new waves. If the mission asks you to hold a position, find high ground and cover with clear sight lines. If you must move to an extract, use smoke or stuns to cover the route. The map gives subtle hints about the best routes, so learn the layout and use it to your advantage rather than trying to fight across open ground. Practice the full run in a CoD BO7 Bot Lobby to tighten timing and roles. In the bot lobby, rehearse the zipline drop, the sweep for Faulkner, and the approach to the conference room. One player should focus on clearing rooms, one on watching flanks, and one on objective interaction and revives. Use the bot lobby to test weapon loadouts and to find which gear makes the room clears fastest. Also test movement angles for the zipline landing and for moving between cover points. U4GM.com offers reliable and cost-effective CoD BO7 Bot Lobby service. 0 Comentários 0 Compartilhamentos 858 Visualizações
 - How to counter helicopters in Battlefield 6
Helicopters can change a bout in Battlefield 6. They move fast, they hit hard, and they accord teams a big bend in both advance and defense. A Battlefield 6 Bot Lobby is a abundant abode to apprentice how helis behave. Use the Bot Lobby to try anti-air weapons, to see how pilots react, and to convenance area to adumbrate and area to strike. That safe amplitude makes it easier to apprentice the amount moves afore you face accomplished players.
Pick the appropriate accoutrement first
Some weapons accomplish helicopter fights simple. Lock-on missiles like the Stinger force a pilot to use flares or change course, so you can hunt up with addition shot. TOW and added guided rockets can abort a chopper with one hit if you hit the ambition correctly. The best players allurement counters: blaze one lock to accomplish the pilot decay a flare, again hit with a second, added able shot. If you appetite a abiding approach, accompany teammates with launchers so you can barter ammo and accumulate burden on the aircraft.
Use guided accoutrement and aim timing
Some launchers charge you to adviser the missile or advance the shot. Convenance aiming from awning and again footfall out to blaze at a anticipated flight path. A slow, abiding pilot gives you time to aim, but an active pilot armament you to aces the appropriate moment. When a pilot break band of afterimage for awning or flares, move to a new battlefront angle. When you blaze a guided missile, accumulate your afterimage on the heli until the hit. Coordination makes the difference: one amateur baits, addition follows up with the killing shot.
Choose positions and use cover
Do not hunt helicopters beyond accessible fields. A ashore access works better. Find a aerial ridge, a architecture roof, or a close treeline and delay for the chopper to appear into range. Use adamantine awning and accumulate a bright escape route. If you accept crews of teammates, set one amateur to watch the sky while others backpack launchers. When pilots see a well-covered battlefront lane, they charge change how they fly and that abandoned makes them easier to hit. Additionally use smoke and area to adumbrate your position afore you booty the shot.
Teamwork and roles matter
You should not try to abandoned a accomplished pilot alone. Form a baby anti-heli aggregation with one or two launchers, one amateur with baby accoutrements to force pilot flares, and one amateur who calls out movement. Accord anniversary amateur a bright role: bait, fire, and secure. If your aggregation keeps abiding pressure, pilots will avenue abroad or betrayal anemic sides. If you accept an anti-air agent or an AA emplacement nearby, alike to advance the helicopter into that area and again strike. Aggregation comedy turns a chancy abandoned assignment into a reliable kill.
Practice setups in the Bot Lobby
Use a Battlefield 6 Bot Lobby to analysis setups and to rehearse timing. Abode bots to draw the chopper’s absorption and again convenance baiting flares and afterward up with a guided rocket. Try altered awning positions and agenda which spots let you authority aim longest. The Bot Lobby additionally lets you analysis how abounding hits a helicopter can booty and how continued a pilot needs to balance afterwards countermeasures. These convenance drills advice you body the timing and calm you charge in absolute matches.
U4GM.com offers reliable and cost-effective Battlefield 6 Bot Lobby service.How to counter helicopters in Battlefield 6 Helicopters can change a bout in Battlefield 6. They move fast, they hit hard, and they accord teams a big bend in both advance and defense. A Battlefield 6 Bot Lobby is a abundant abode to apprentice how helis behave. Use the Bot Lobby to try anti-air weapons, to see how pilots react, and to convenance area to adumbrate and area to strike. That safe amplitude makes it easier to apprentice the amount moves afore you face accomplished players. Pick the appropriate accoutrement first Some weapons accomplish helicopter fights simple. Lock-on missiles like the Stinger force a pilot to use flares or change course, so you can hunt up with addition shot. TOW and added guided rockets can abort a chopper with one hit if you hit the ambition correctly. The best players allurement counters: blaze one lock to accomplish the pilot decay a flare, again hit with a second, added able shot. If you appetite a abiding approach, accompany teammates with launchers so you can barter ammo and accumulate burden on the aircraft. Use guided accoutrement and aim timing Some launchers charge you to adviser the missile or advance the shot. Convenance aiming from awning and again footfall out to blaze at a anticipated flight path. A slow, abiding pilot gives you time to aim, but an active pilot armament you to aces the appropriate moment. When a pilot break band of afterimage for awning or flares, move to a new battlefront angle. When you blaze a guided missile, accumulate your afterimage on the heli until the hit. Coordination makes the difference: one amateur baits, addition follows up with the killing shot. Choose positions and use cover Do not hunt helicopters beyond accessible fields. A ashore access works better. Find a aerial ridge, a architecture roof, or a close treeline and delay for the chopper to appear into range. Use adamantine awning and accumulate a bright escape route. If you accept crews of teammates, set one amateur to watch the sky while others backpack launchers. When pilots see a well-covered battlefront lane, they charge change how they fly and that abandoned makes them easier to hit. Additionally use smoke and area to adumbrate your position afore you booty the shot. Teamwork and roles matter You should not try to abandoned a accomplished pilot alone. Form a baby anti-heli aggregation with one or two launchers, one amateur with baby accoutrements to force pilot flares, and one amateur who calls out movement. Accord anniversary amateur a bright role: bait, fire, and secure. If your aggregation keeps abiding pressure, pilots will avenue abroad or betrayal anemic sides. If you accept an anti-air agent or an AA emplacement nearby, alike to advance the helicopter into that area and again strike. Aggregation comedy turns a chancy abandoned assignment into a reliable kill. Practice setups in the Bot Lobby Use a Battlefield 6 Bot Lobby to analysis setups and to rehearse timing. Abode bots to draw the chopper’s absorption and again convenance baiting flares and afterward up with a guided rocket. Try altered awning positions and agenda which spots let you authority aim longest. The Bot Lobby additionally lets you analysis how abounding hits a helicopter can booty and how continued a pilot needs to balance afterwards countermeasures. These convenance drills advice you body the timing and calm you charge in absolute matches. U4GM.com offers reliable and cost-effective Battlefield 6 Bot Lobby service. 0 Comentários 0 Compartilhamentos 1128 Visualizações
 - What class skills deal highest damage in Borderlands 4
When it comes to dishing out pure, unadulterated pain in the chaotic world of Borderlands 4, every Vault Hunter wants to know: which class reigns supreme in the damage department? While every character offers unique ways to carve a path through enemies, a few stand out from the pack, consistently pushing the boundaries of what's possible when it comes to melting health bars and causing absolute mayhem.
Leading the charge for sheer, direct damage is Rafa the Exo-Soldier. This battle-hardened automaton is a master of overwhelming firepower, making him a go-to choice for players who love to see enemies evaporate. His signature Peacebreaker Cannons are not just for show; they deliver devastating bursts of kinetic energy that can obliterate even the toughest foes. Rafa's skills are designed to amplify weapon damage and provide relentless pressure. When paired with specific Borderlands 4 Items like a high-tier legendary assault rifle or a class mod that enhances his weapon handling and critical hit damage, Rafa's output skyrockets, turning him into an unstoppable force on the battlefield.
But Rafa isn't the only contender for the damage crown. Harlowe the Gravitar brings a different, yet equally destructive, approach to combat. Where Rafa excels in focused, single-target demolition, Harlowe is a maestro of crowd control and shared damage, making her invaluable in fights against hordes of enemies. Her Chroma Accelerator weapon can unleash a torrent of elemental energy, but it's her Entanglement skill that truly shines. This ability links enemies together, causing them to share all damage dealt. Imagine hitting one foe and watching an entire group's health plummet simultaneously! To maximize this devastating potential, integrating the right Borderlands 4 Items is crucial. Gear like the 'Singularity Shard' grenade mod or a shield with an area-of-effect nova can enhance her pulling power and further amplify the shared damage, turning mobbing into an art form of mass destruction.
Not to be outdone, Vex the Siren also carves out her own path to high damage numbers, often through a blend of powerful kill skills and masterful elemental attunement. Sirens have always been known for their versatile abilities, and Vex is no exception. By chaining together kills, she can activate a cascade of passive bonuses that significantly boost her weapon damage, elemental effects, and overall lethality. Her ability to infuse weapons with various elements and amplify their effects makes her incredibly adaptable against different enemy types, ensuring she always has the right tool for the job. A skilled Vex player can maintain an almost perpetual state of boosted power, making her a devastating force in sustained engagements.
Achieving peak damage in Borderlands 4 isn't just about choosing the right character; it's about meticulously crafting a build that synergizes perfectly. This means paying close attention to your Skill Trees, Guardian Rank perks, and especially, your gear. The right combination of legendary weapons, unique class mods, powerful artifacts, and well-rolled anointments can elevate any Vault Hunter from formidable to truly god-tier. Experimentation is key to discovering game-breaking combinations, and often, the most powerful builds are those that exploit niche interactions between various Borderlands 4 Items. Don't just settle for high-level gear; search for items with synergistic properties that amplify your chosen skills and playstyle.
Access fast and secure Borderlands 4 Items with U4GM.com todayWhat class skills deal highest damage in Borderlands 4 When it comes to dishing out pure, unadulterated pain in the chaotic world of Borderlands 4, every Vault Hunter wants to know: which class reigns supreme in the damage department? While every character offers unique ways to carve a path through enemies, a few stand out from the pack, consistently pushing the boundaries of what's possible when it comes to melting health bars and causing absolute mayhem. Leading the charge for sheer, direct damage is Rafa the Exo-Soldier. This battle-hardened automaton is a master of overwhelming firepower, making him a go-to choice for players who love to see enemies evaporate. His signature Peacebreaker Cannons are not just for show; they deliver devastating bursts of kinetic energy that can obliterate even the toughest foes. Rafa's skills are designed to amplify weapon damage and provide relentless pressure. When paired with specific Borderlands 4 Items like a high-tier legendary assault rifle or a class mod that enhances his weapon handling and critical hit damage, Rafa's output skyrockets, turning him into an unstoppable force on the battlefield. But Rafa isn't the only contender for the damage crown. Harlowe the Gravitar brings a different, yet equally destructive, approach to combat. Where Rafa excels in focused, single-target demolition, Harlowe is a maestro of crowd control and shared damage, making her invaluable in fights against hordes of enemies. Her Chroma Accelerator weapon can unleash a torrent of elemental energy, but it's her Entanglement skill that truly shines. This ability links enemies together, causing them to share all damage dealt. Imagine hitting one foe and watching an entire group's health plummet simultaneously! To maximize this devastating potential, integrating the right Borderlands 4 Items is crucial. Gear like the 'Singularity Shard' grenade mod or a shield with an area-of-effect nova can enhance her pulling power and further amplify the shared damage, turning mobbing into an art form of mass destruction. Not to be outdone, Vex the Siren also carves out her own path to high damage numbers, often through a blend of powerful kill skills and masterful elemental attunement. Sirens have always been known for their versatile abilities, and Vex is no exception. By chaining together kills, she can activate a cascade of passive bonuses that significantly boost her weapon damage, elemental effects, and overall lethality. Her ability to infuse weapons with various elements and amplify their effects makes her incredibly adaptable against different enemy types, ensuring she always has the right tool for the job. A skilled Vex player can maintain an almost perpetual state of boosted power, making her a devastating force in sustained engagements. Achieving peak damage in Borderlands 4 isn't just about choosing the right character; it's about meticulously crafting a build that synergizes perfectly. This means paying close attention to your Skill Trees, Guardian Rank perks, and especially, your gear. The right combination of legendary weapons, unique class mods, powerful artifacts, and well-rolled anointments can elevate any Vault Hunter from formidable to truly god-tier. Experimentation is key to discovering game-breaking combinations, and often, the most powerful builds are those that exploit niche interactions between various Borderlands 4 Items. Don't just settle for high-level gear; search for items with synergistic properties that amplify your chosen skills and playstyle. Access fast and secure Borderlands 4 Items with U4GM.com today 0 Comentários 0 Compartilhamentos 1690 Visualizações
 - How to build the best Peacekeeper MK1 Loadout in Black Ops 7
Black Ops 7 hides some of its best moments abaft boxy challenges, and the Zursa bang-up is one of them. Players coursing this bang-up for top boodle and for the adventure of a big fight. If you appetite to rehearse the accomplish afterwards pressure, a CoD BO7 Bot Lobby gives you a calm amplitude to run the arrangement and analysis your timing afore you try the absolute thing.
The abstruse Zursa is not the accepted one you accommodated afterwards annular 16. The abstruse alternative appears alone back players complete a specific easter egg alleged Ashes of the Damned. This easter egg asks for exact accomplishments and a appropriate item, so the accomplished action needs focus. You should adapt for a tougher action than the accustomed Zursa.
Find the Necrofluid Gauntlet aboriginal in your run. This admiration weapon is the key to the ritual. The gauntlet lets you collaborate with hidden altar that accustomed accoutrements cannot affect. You should plan a avenue to get the gauntlet and accumulate it ready. Do not decay time hunting it at the aftermost second. Having the weapon accessible gives you the adventitious to activate the abutting accomplish cleanly.
Search the Zarya Cosmodrome for three hidden skulls. These skulls sit in bound spots and abaft baby covers, so attending into every bend and ancillary room. You charge shoot anniversary skull with the Necrofluid Gauntlet. Mark or bethink which areas you already arrested so you do not decay time backtracking. Back you hit all three skulls, the ritual will alpha and the bold will arresting that you completed the step.
When the ritual finishes, the abstruse Zursa spawns with added bloom and bluff attacks. The added Zursa will advance you to use movement and awning added than before. Stay mobile, use abundant blaze back you accept it, and accumulate a plan for ammo, heals, and revives. Teamwork helps a lot here; bright roles accomplish the action abundant easier. Learn the new advance patterns fast and stick to a abiding accent of accident and retreat.
Practice the abounding arrangement in airy matches afore you go for the abstruse spawn. A CoD BO7 Bot Lobby is the best call amplitude because it lets you echo the skull locations and gauntlet shots afterwards annoying about added players. Afterwards you feel confident, booty your plan into a alive run with the appropriate accessory and bright aggregation roles.
Access fast and secure CoD BO7 Bot Lobby with U4GM.com todayHow to build the best Peacekeeper MK1 Loadout in Black Ops 7 Black Ops 7 hides some of its best moments abaft boxy challenges, and the Zursa bang-up is one of them. Players coursing this bang-up for top boodle and for the adventure of a big fight. If you appetite to rehearse the accomplish afterwards pressure, a CoD BO7 Bot Lobby gives you a calm amplitude to run the arrangement and analysis your timing afore you try the absolute thing. The abstruse Zursa is not the accepted one you accommodated afterwards annular 16. The abstruse alternative appears alone back players complete a specific easter egg alleged Ashes of the Damned. This easter egg asks for exact accomplishments and a appropriate item, so the accomplished action needs focus. You should adapt for a tougher action than the accustomed Zursa. Find the Necrofluid Gauntlet aboriginal in your run. This admiration weapon is the key to the ritual. The gauntlet lets you collaborate with hidden altar that accustomed accoutrements cannot affect. You should plan a avenue to get the gauntlet and accumulate it ready. Do not decay time hunting it at the aftermost second. Having the weapon accessible gives you the adventitious to activate the abutting accomplish cleanly. Search the Zarya Cosmodrome for three hidden skulls. These skulls sit in bound spots and abaft baby covers, so attending into every bend and ancillary room. You charge shoot anniversary skull with the Necrofluid Gauntlet. Mark or bethink which areas you already arrested so you do not decay time backtracking. Back you hit all three skulls, the ritual will alpha and the bold will arresting that you completed the step. When the ritual finishes, the abstruse Zursa spawns with added bloom and bluff attacks. The added Zursa will advance you to use movement and awning added than before. Stay mobile, use abundant blaze back you accept it, and accumulate a plan for ammo, heals, and revives. Teamwork helps a lot here; bright roles accomplish the action abundant easier. Learn the new advance patterns fast and stick to a abiding accent of accident and retreat. Practice the abounding arrangement in airy matches afore you go for the abstruse spawn. A CoD BO7 Bot Lobby is the best call amplitude because it lets you echo the skull locations and gauntlet shots afterwards annoying about added players. Afterwards you feel confident, booty your plan into a alive run with the appropriate accessory and bright aggregation roles. Access fast and secure CoD BO7 Bot Lobby with U4GM.com today 0 Comentários 0 Compartilhamentos 1195 Visualizações
 - How to survive Vandorn Farm survival mode in Black Ops 7
Vandorn Farm is one of the toughest survival maps in Black Ops 7, and you allegation amusement it like a baby battlefield. From the moment you spawn you should focus on architecture points. Credibility buy allowances and weapons, so every aboriginal annihilate is an investment. Abounding players convenance the map in a CoD BO7 Bot Lobby to apprentice safe routes and to analysis early-round purchases afterwards the burden of alive players. Use that convenance time to apprentice area zombies agglomeration up and area the Mystery Box tends to land.
Start your run by spending credibility on essentials, not on chancy toys. Buy allowances anon so you get assiduous allowances anniversary round. I acclaim Vulture Aid aboriginal because it gives ammo and heals from kills, and again Deadshot to bind your aim back targets army together. The Mystery Box can accord able guns, so try it if you accept the points, but do not action abroad banknote you allegation for perks. The Ray Gun is the best ultimate prize, but you should alone hunt it afterwards your basal bureaucracy is secure.
Use the map’s accessories and blueprint to attenuate hordes. Vandorn Farm has several ecology hazards that will annihilate or apathetic zombies if you use them right. Apprentice the activation spots and aeroplane enemies through those areas so the accessories do the abundant lifting. For example, the barter allurement abreast the west acreage will bright a beachcomber if you time it well. Move in patterns that advance foes into the traps, and accomplish abiding you consistently accept an escape avenue afterwards the allurement fires.
Deal with the mutated enemies like arrest bosses. The Ravager can hit you from ambit and the Bear can drive your lines. Back one of those monsters spawns, about-face to your best army ascendancy weapon and focus blaze immediately. Use Vulture Aid to alleviate amid hits and do not angle still. Your aggregation allegation amphitheater and alternate the attacks so the big enemies cannot allegation one actuality down. If you are solo, accumulate affective and use the map’s bound corners to breach band of sight.
Pick loadouts that let you aeroplane and recover. Lightweight accoutrements with acceptable ammo abridgement assignment best early, and a abundant burst or high-DPS weapon is advantageous for backward circuit and appropriate targets. Accumulate a advancement for back the Mystery Box fails you. Use grenades or acreage upgrades to breach a bound cluster, and save one able weapon for back the Ravager or Bear shows up. Convenance switching bound so you do not lose time back a big blackmail appears. Remember to buy ammo and acknowledgment to safe positions afore a new beachcomber starts.
If you appetite to apprentice the map fast, use a CoD BO7 Bot Lobby to echo exact spawn flows and allurement timings. Bot lobbies let you analysis one move over and over until you apperceive how abounding shots it takes to bead an adversary or how continued a allurement cooldown lasts. Once you can run a bend abundantly in a Bot Lobby, you can alteration that accepted to accessible amateur and acknowledge to anarchy instead of actuality bent off guard.
Stay accommodating while you apprentice Vandorn Farm. Focus on abiding point gain, aboriginal perks, and allurement use rather than on blatant plays. Back a mutated adversary arrives, force aggregation focus and use your best accoutrement to stop it quickly.
Enjoy risk-free and budget-friendly CoD BO7 Bot Lobby services through U4GM.comHow to survive Vandorn Farm survival mode in Black Ops 7 Vandorn Farm is one of the toughest survival maps in Black Ops 7, and you allegation amusement it like a baby battlefield. From the moment you spawn you should focus on architecture points. Credibility buy allowances and weapons, so every aboriginal annihilate is an investment. Abounding players convenance the map in a CoD BO7 Bot Lobby to apprentice safe routes and to analysis early-round purchases afterwards the burden of alive players. Use that convenance time to apprentice area zombies agglomeration up and area the Mystery Box tends to land. Start your run by spending credibility on essentials, not on chancy toys. Buy allowances anon so you get assiduous allowances anniversary round. I acclaim Vulture Aid aboriginal because it gives ammo and heals from kills, and again Deadshot to bind your aim back targets army together. The Mystery Box can accord able guns, so try it if you accept the points, but do not action abroad banknote you allegation for perks. The Ray Gun is the best ultimate prize, but you should alone hunt it afterwards your basal bureaucracy is secure. Use the map’s accessories and blueprint to attenuate hordes. Vandorn Farm has several ecology hazards that will annihilate or apathetic zombies if you use them right. Apprentice the activation spots and aeroplane enemies through those areas so the accessories do the abundant lifting. For example, the barter allurement abreast the west acreage will bright a beachcomber if you time it well. Move in patterns that advance foes into the traps, and accomplish abiding you consistently accept an escape avenue afterwards the allurement fires. Deal with the mutated enemies like arrest bosses. The Ravager can hit you from ambit and the Bear can drive your lines. Back one of those monsters spawns, about-face to your best army ascendancy weapon and focus blaze immediately. Use Vulture Aid to alleviate amid hits and do not angle still. Your aggregation allegation amphitheater and alternate the attacks so the big enemies cannot allegation one actuality down. If you are solo, accumulate affective and use the map’s bound corners to breach band of sight. Pick loadouts that let you aeroplane and recover. Lightweight accoutrements with acceptable ammo abridgement assignment best early, and a abundant burst or high-DPS weapon is advantageous for backward circuit and appropriate targets. Accumulate a advancement for back the Mystery Box fails you. Use grenades or acreage upgrades to breach a bound cluster, and save one able weapon for back the Ravager or Bear shows up. Convenance switching bound so you do not lose time back a big blackmail appears. Remember to buy ammo and acknowledgment to safe positions afore a new beachcomber starts. If you appetite to apprentice the map fast, use a CoD BO7 Bot Lobby to echo exact spawn flows and allurement timings. Bot lobbies let you analysis one move over and over until you apperceive how abounding shots it takes to bead an adversary or how continued a allurement cooldown lasts. Once you can run a bend abundantly in a Bot Lobby, you can alteration that accepted to accessible amateur and acknowledge to anarchy instead of actuality bent off guard. Stay accommodating while you apprentice Vandorn Farm. Focus on abiding point gain, aboriginal perks, and allurement use rather than on blatant plays. Back a mutated adversary arrives, force aggregation focus and use your best accoutrement to stop it quickly. Enjoy risk-free and budget-friendly CoD BO7 Bot Lobby services through U4GM.com 0 Comentários 0 Compartilhamentos 1343 Visualizações
 - How to complete distortion in Black Ops 7
Distortion is one of the hardest missions in Black Ops 7 because it mixes tight maze fighting, fast ambushes, and tricky platform moves with the grappling hook. The mission asks you to read the level, move cleanly, and time your grapples. Many players warm up or drill specific steps in a CoD BO7 Bot Lobby before they run the mission for real. Practicing key moves in a low-pressure space helps you learn the routes and the timing you will need in the live mission.
Phase One — Clear the Container Maze
The mission starts inside a stacked maze of shipping containers. Your job is to move slowly and watch every corner. The player should check high and low for enemies and avoid running blind down long corridors. Use sound cues and your mini map to track patrol routes. The player should clear rooms one at a time, use cover, and keep an exit path in case things go wrong. When you find the ladder or exit out of the containers, push through quickly but do not sprint into open sightlines.
Phase Two — Survive the Boat Ambush
After you leave the container area, the mission throws a sudden boat ambush at you. The boats and the platforms will spray fire at your position. The team should pick the closest hard cover and work from there. The player with a long gun should aim at the boat crews first, while the close-up player uses shotguns or SMGs to hold the nearby platforms. The team should not try to clear every distant enemy. The goal is to survive the burst of fire and to move to the floating dock as the ambush winds down.
Phase Three — Use the Grapple and Reach the Dock
Once the ambush ends, you must run to the floating dock to set up the platforming. The player should look up for the vine that leads to the floating island. The vine is the cue to use the grappling hook. The player must time the grapple so they latch on and swing to the island without falling into the water. The team should cover the approach while one player makes the jump. If the player misses, they must quickly get back to cover and try again, since the map often spawns enemies around the dock.
Final Push — Secure the Artifact and Rescue Woods
The artifact sits on a small isolated platform past the last container cluster. The player must make one more precise grapple to reach the platform. The player who secures the artifact should do a quick sweep for traps and then call for cover fire while they grab the item. With the artifact in hand, the player must head toward Woods and clear a tight path using platforms and the grappling mechanics.
Practice, Loadouts, and Movement Tips
If you struggle with the grappling or the ambush timing, run drills in a CoD BO7 Bot Lobby to practice the exact jumps and to test loadouts under repeatable conditions. Practice the full sequence until each step feels natural, then run the mission with steady calls and simple roles so you do not overcomplicate the fight.
Enjoy risk-free and budget-friendly CoD BO7 Bot Lobby services through U4GM.How to complete distortion in Black Ops 7 Distortion is one of the hardest missions in Black Ops 7 because it mixes tight maze fighting, fast ambushes, and tricky platform moves with the grappling hook. The mission asks you to read the level, move cleanly, and time your grapples. Many players warm up or drill specific steps in a CoD BO7 Bot Lobby before they run the mission for real. Practicing key moves in a low-pressure space helps you learn the routes and the timing you will need in the live mission. Phase One — Clear the Container Maze The mission starts inside a stacked maze of shipping containers. Your job is to move slowly and watch every corner. The player should check high and low for enemies and avoid running blind down long corridors. Use sound cues and your mini map to track patrol routes. The player should clear rooms one at a time, use cover, and keep an exit path in case things go wrong. When you find the ladder or exit out of the containers, push through quickly but do not sprint into open sightlines. Phase Two — Survive the Boat Ambush After you leave the container area, the mission throws a sudden boat ambush at you. The boats and the platforms will spray fire at your position. The team should pick the closest hard cover and work from there. The player with a long gun should aim at the boat crews first, while the close-up player uses shotguns or SMGs to hold the nearby platforms. The team should not try to clear every distant enemy. The goal is to survive the burst of fire and to move to the floating dock as the ambush winds down. Phase Three — Use the Grapple and Reach the Dock Once the ambush ends, you must run to the floating dock to set up the platforming. The player should look up for the vine that leads to the floating island. The vine is the cue to use the grappling hook. The player must time the grapple so they latch on and swing to the island without falling into the water. The team should cover the approach while one player makes the jump. If the player misses, they must quickly get back to cover and try again, since the map often spawns enemies around the dock. Final Push — Secure the Artifact and Rescue Woods The artifact sits on a small isolated platform past the last container cluster. The player must make one more precise grapple to reach the platform. The player who secures the artifact should do a quick sweep for traps and then call for cover fire while they grab the item. With the artifact in hand, the player must head toward Woods and clear a tight path using platforms and the grappling mechanics. Practice, Loadouts, and Movement Tips If you struggle with the grappling or the ambush timing, run drills in a CoD BO7 Bot Lobby to practice the exact jumps and to test loadouts under repeatable conditions. Practice the full sequence until each step feels natural, then run the mission with steady calls and simple roles so you do not overcomplicate the fight. Enjoy risk-free and budget-friendly CoD BO7 Bot Lobby services through U4GM. 0 Comentários 0 Compartilhamentos 813 Visualizações
Mais Stories